I think a staple of being a nerd is never being truly satisfied with your cable management. There’s always a cable out of place or tangled up. Cables get lost in the web of wires, becoming the physical manifestation of cruft as they power and display our digital worlds.
Back when I set up the entertainment center upon moving into my studio last May, I was never satisfied with cable routing. I would constantly be behind a TV to swap a HDMI cable or plug a new thing in. My HDMI switches would fall off the top shelf, being pulled down by the cables. It was a frustrating mess.
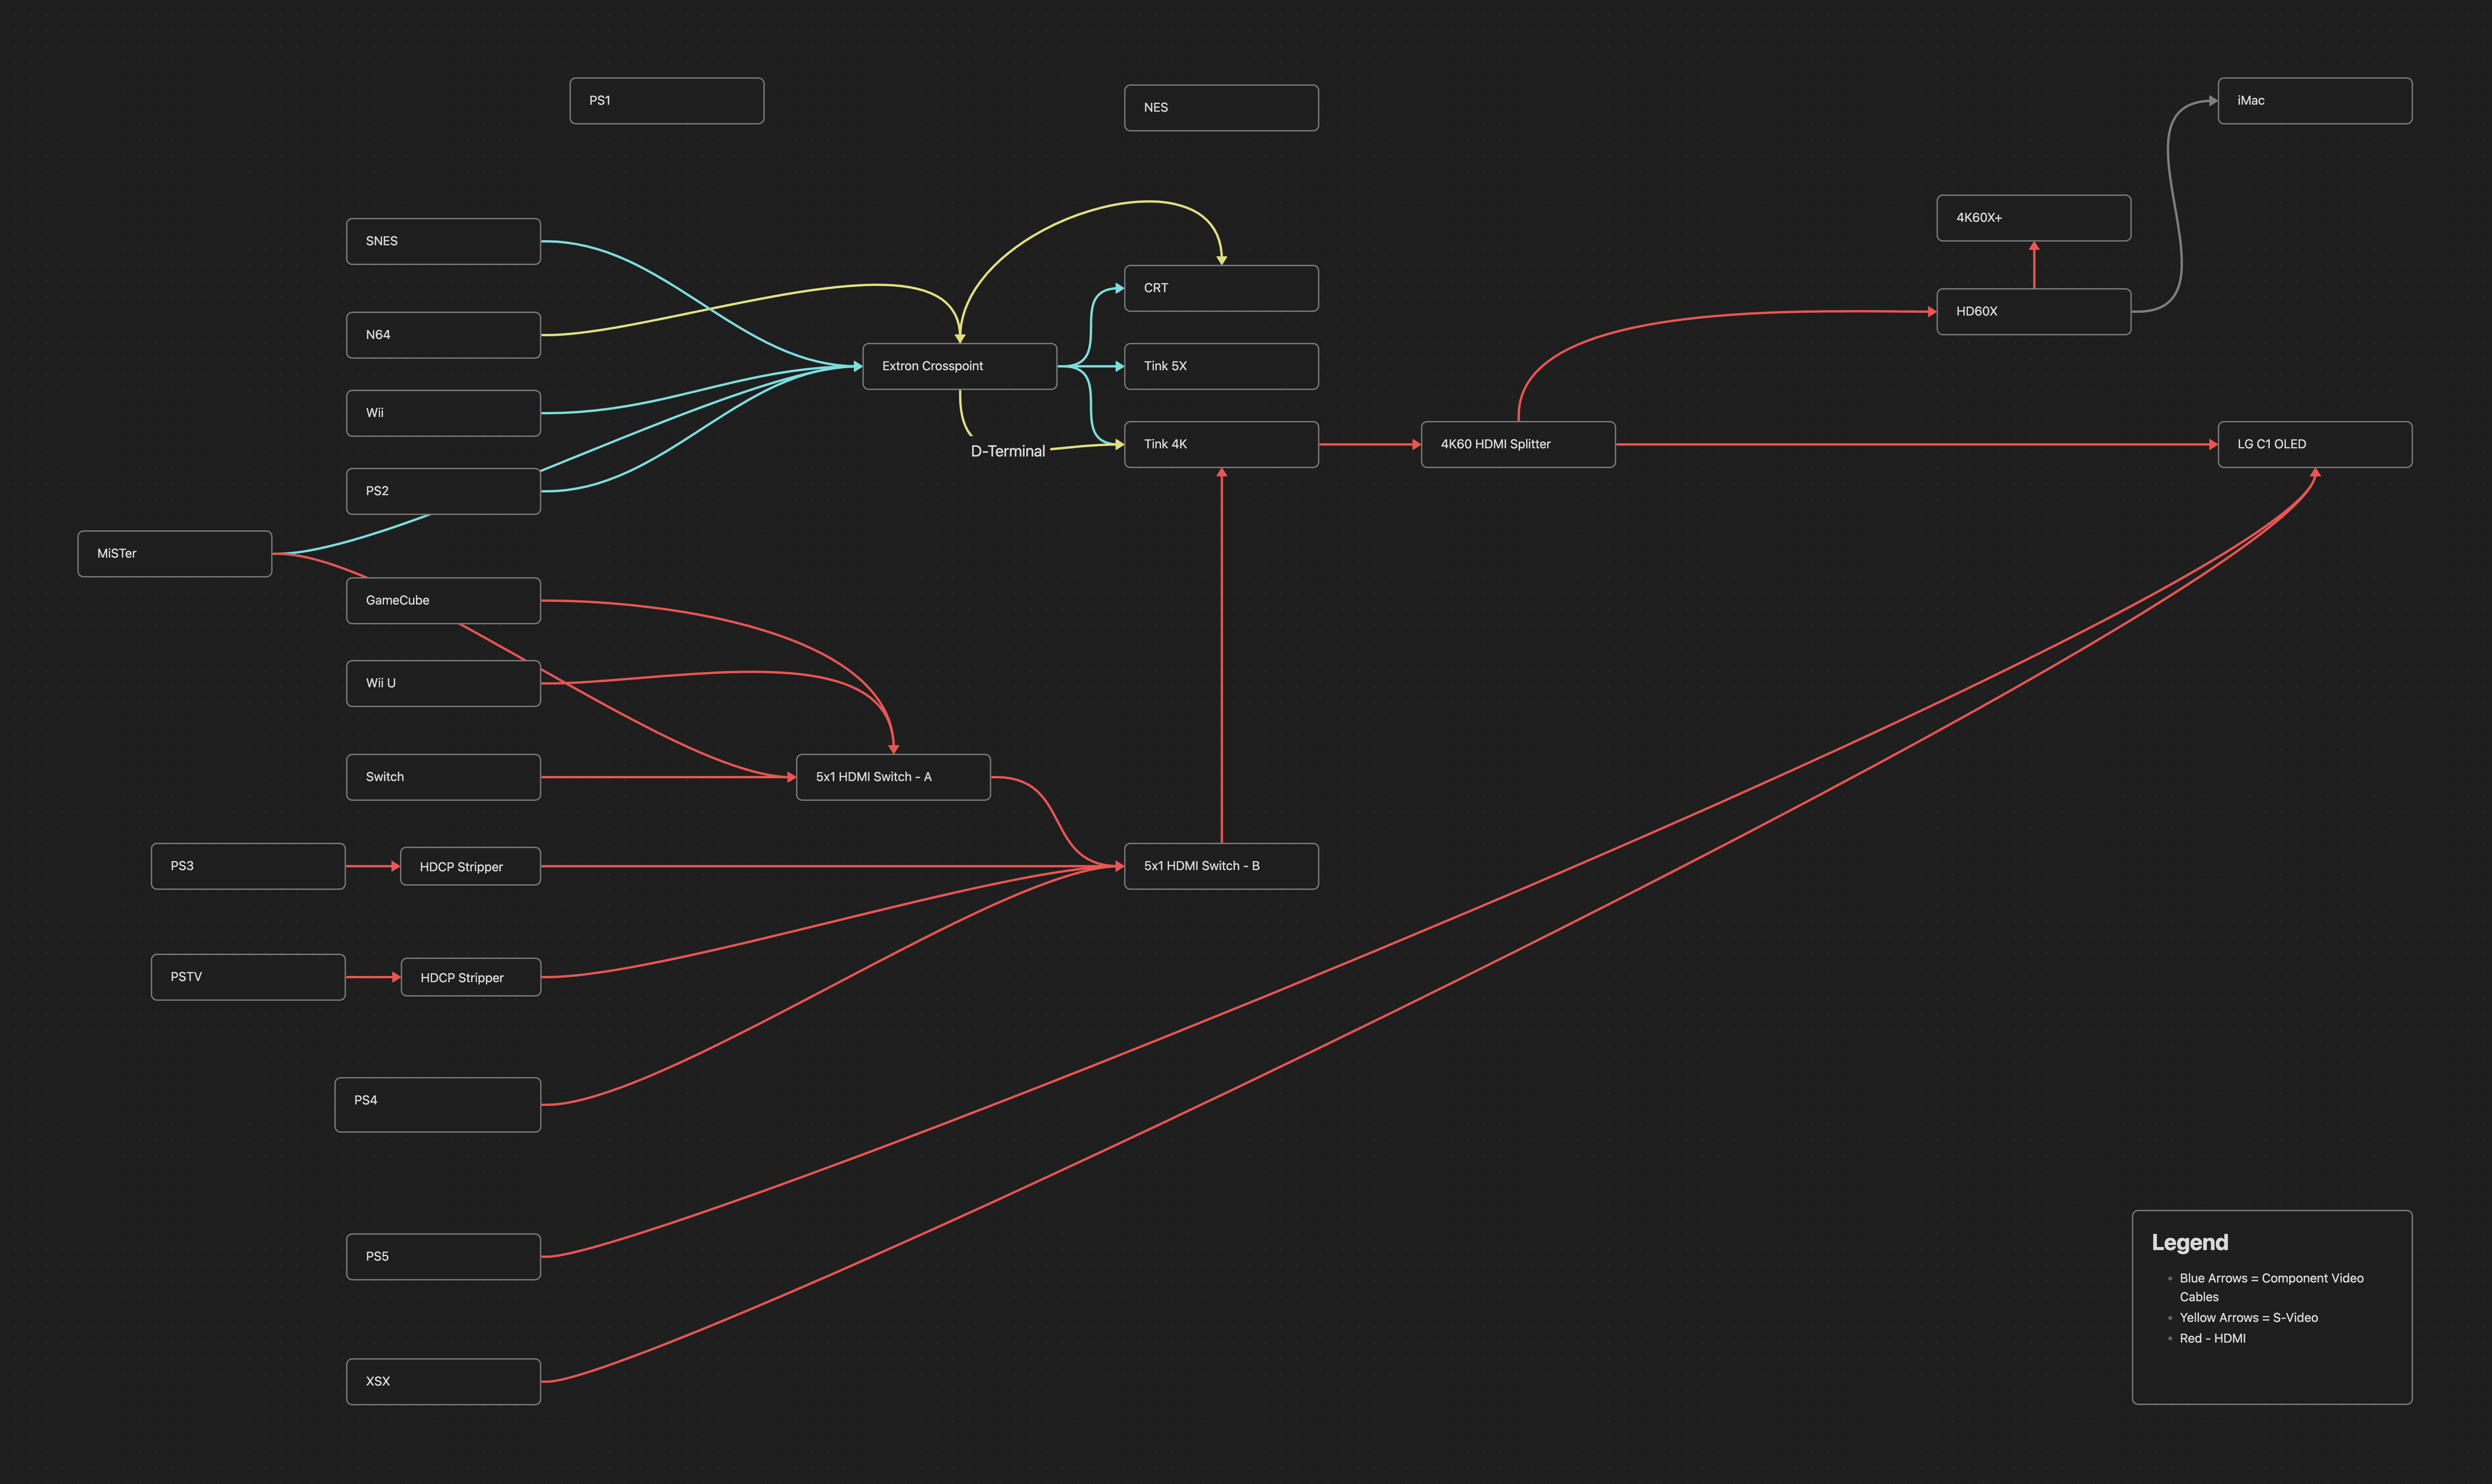
So when planning to buy a RetroTINK-4K, I knew I’d need to redesign and rewire my setup to use the scaler without having to hotswap my way to 4K. I drew out a diagram on the back of one of my daughter’s daily daycare reports months ago with a handful of priorities.
- All HDMI 2.0 consoles need to be routed into one cable feeding into the RetroTINK-4K. No hotswapping.
- The Extron Crosspoint needs to feed into both RetroTINK scalers (4K and 5X).
- The 4K needs to go both to the LG C1 and capture card/s.
- Minimize the need to get behind the TV. Switches need to stop falling.
The daisy chain of cables I drew up led to me buying a few additional supplies—a 4K HDMI splitter and audio extractor, a 3-port HDMI switch, a third surge protector, cable sheathing, and four new HDMI cables.1 I bought a Carby GC-video HDMI adapter. I wanted the latest version of GC-video and didn’t have the means (or desire) to update my GCHD MK-II.
I also needed to a BNC to HD-15 cable to feed the Extron Crosspoint into the RetroTINK-4K. The HD-15 port on the TINK was the only way to feed S-Video into the back of the scaler.2
A month ago I cleared my entire Saturday morning to tackle the project. I knew it’d take me almost all day and I was right. It took me a solid six hours, not counting breaks to eat. You can watch the entire process. I mounted my iPhone up on the ceiling and used the time lapse feature to record the whole thing.
The process was rather straightforward: Take it all out and put it back. The devil is in the details though. With 11 consoles to route into one upscaler, two displays, and two capture cards, there’s a whole lot of cables to run—and it wouldn’t be “cable management” if it all didn’t look good from the front (and the back too).
I started out by reviewing and finalizing my routing sketch. I migrated the drawing into Obsidian's Canvas feature and it looks a lot better than scratched out on the back of a daycare form.
Once I finished reviewing my plans, I hit play on a podcast and got to work.3 Unplugging everything and piling it up was the most satisfying bit. I imagine it is like demo day on a show for HGTV. You can to "tear it all down" with no concerns about disruption. In fact, disruption is the goal.
I took the opportunity to vacuum and dust behind the TV. I got to take stock of the HDMI cables I had woven back there. I found adapters, dongles, and cables I wasn't going to need on a regular basis. It was a good, deep clean.
Up next were the power supplies. I have two nice surge protectors and two older ones. I wanted the nice ones to be the center and power all the hardware, with the other two powering accessories, hubs, and the like. I may be skinny, but I am not tiny enough to fit behind the set up. If I wasn't so nervous every time I've had to move my TV, I probably would have asked for help to take it down to have an easier time routing behind there.
With the surge protectors in place, I began the placement of the power cables and supplies. There are six external power bricks back there and I carefully located them so I could neatly wrap their own cables while feeding to the consoles.4 When I was finished, I was feeling good. It looked clean and clear. Then the video cables entered the arena.
A goal this time around was to try cable sheathing. The HDMI cables aren’t supposed to move or leave back there. Each console has their own, so I wanted to bundle groups together to help contain them. Each block of my Kalax sort of had its own cluster—the PlayStation block and the Nintendo blocks.
I bought three bundles of cable sheathing in black, red, and blue. I grouped up the HDMI and snaked them through. It was a little tricky at first, but I figured out the hand incantation required to maneuver the cables through. The trickiest bundle was a pair of analog cables for my GameCubes. I ran one official Nintendo Wii component cable and an official composite cable. Why the composite? Well, I was under the impression that the Carby did no sound. I took this one snippet from My Life in Gaming’s video as “the only way.” I was delighted to find out the Carby, in fact, does carry audio! But I also now have some composite cables dangling back there. Even with all my planning, there’s still an unused cable haunting the dream of clean management.
The final trick to all these HDMI cables was where they would go from the consoles. My set-up feeds them into two 5-1 HDMI switches. I’ve got the Nintendo consoles and MiSTer in one that feeds into the second with the PlayStation cables. That second switch would feed all the digital signal consoles into the TINK. But let’s circle back to priority number four:
Minimize the need to get behind the TV. Switches need to stop falling.
I was so sick of those switches falling off the top of my shelves. So I decided to mount those suckers with some mounting tape to the back of my cabinet. They are all lined up with proper slack. One of my two foot HDMI cables snakes right up and cleanly plugs into the upscaler. Now the sight of HDMI cables clawing their way up to the TV is no more.
I applied this same technique to my HDMI splitters that strip the HDCP from my PS3 and PS TV as well as the HDMI splitter the takes the TINK output and sends it to the TV and my capture cards. This whole mounting switches and splitters may be the best solution from the whole project.
The last bunch of cords to deal with were the ethernet. Originally, I just placed them in the same spot—draped on top of everything feeding into an eight port switch tucked behind the MiSTer and the TINK-4K’s spot. After assessing everything in action a couple days later, I realized I had no good spot for the TINK-5X. And given the fact the ethernet already sort of looked bad, I just pushed the switch off the shelf and let it sink to the bottom of the sea of cables. 😬
I know. It feels like a total stumble at the finish line to just drop this anchor down there. But it hides it all out of sight. I don’t have to worry about plugging in or unplugging them. They can just exist in their coiled up state, hidden out of sight.
So all of that was just the HDMI consoles…
Thankfully, the analog ones were essentially all set. I dialed in my Extron Crosspoint setup when I got it back in September 2023. I tidied up the cabling behind the CRT a smidge and replugged in all my component cables. Easy.
When all of it was said and done, I felt good. Then the TINK-4K arrived and I finally got to see if all my hard work panned out. The first game I went to boot was Ocarina of Time. That start screen feels like the equivalent of "Hello World" when making a computer language do something for the first time. After a little ol’ S-Video troubleshooting5, the results were glorious.
This whole project was well worth my time, and not just because it ended with razor sharp 4K scaling. There’s a satisfaction in the flow of knowing my video chain is seamless. It “just works.” After hours and hours of research and implementation. But now I can reap the fruits of my labor for years and years to come. That is, until I add a new console to the mix or buy a new cable and have to route it in somewhere. Then the desire to rewire will begin to grow, but hey, that’s all a part of being a nerd.
Footnotes
-
I bought these: 3-port HDMI switch, HDMI Splitter and Audio Extractor, surge protector, cable sheathing, two 6.6' and two 2' HDMI 2.1 cables. ↩
-
Gotta have both clean cable routing and clean N64 gameplay. ↩
-
A long project required long podcasts. I listened to The Talk Show Ep. 396 and Lex Fridman #309 - John Carmack. ↩
-
There's the PS TV brick, the two GameCubes, and the two supplies for the Wii U and GamePad. I counted the Switch OLED as well, with its more wall wart power supply. ↩
-
Had to swap the positioning of S-Video out from my Crosspoint. Whoops. ↩